We finally modified the Remote.msi installer to install the Remote server exe (and help and ini files) to the Common Files folder. This is usually:
C:\Program Files (x86)\Common Files\Probe Software
We used to install Remote (and Matrix) to the Windows System folder (usually System32 or SysWOW64), but Microsoft has been locking this folder down more with each new OS release. So now the Remote.exe, Remote.chm and Remote.ini files all go into the above Common Files folder. The only file you need to worry about is the Remote.ini file as that needs to point to where Remote can find the Probe for EPMA app folder for instrument communications. By default the PFE path defined in the Remote.ini file is:
C:\Program Files (x86)\Probe Software\Probe for EPMA
And that is usually where PFE is installed by default on Windows 7 and up (in Windows XP and older 32 bit operating systems it will be C:\Program Files\Probe Software\Probe for EPMA).
This change should mean that when running code that calls our Remote Server interface for custom app development to control your instrument, Windows should no longer get upset. That is, you should no longer have to change the compatibility properties of the Remote.exe app to "Run as Administrator" or modify the User Access Control (UAC). But a couple of pointers:
1. You should probably uninstall your existing Remote Server installation using the Windows Control Panel before installing the new v. 12.2.7 Remote Server. Note that during the re-install you may get a warning dialog about "Software Classes" during the Remote installation which offers you some Cancel/Retry/Ignore buttons. Just click the Ignore button and all will be OK. We are trying to understand why we are getting this warning, but it should just be ignored for now!
2. The test app for the Remote Server interface is TestRemote.exe and the executable and all the VB6 source files are installed (as before) in the folder:
C:\Program Files (x86)\Probe Software\Remote
The TestRemote.exe should now run properly "out of the box".
3. But if you want to use Excel to create your Remote macros, I have found several minor issues that you may or may not see depending on your OS and system settings.
First, you should probably want to run your Excel (Matlab, LabView, etc.) macros from another folder other than the program files folder as that is write protected. So copy the test apps and/or Excel files to a folder of your own choosing. Since the Remote Server is now installed to the Common Files folder, your apps and macros should be able to find it automatically (once the reference to it is set properly).
Second, you may need to click the "Enable Content" option (in color at the top of the Excel) to enable macros in Excel.
Third you might need to run Excel "as admin" the first time (or maybe every time depending on your system settings). I had to run Excel using the "Run as Administrator" option by right clicking on Excel.exe in the Microsoft\Office folder, in order to specify the Remote Automation library in the References dialog in Excel. Look for the Reference labeled Remote Automation Interface as shown here and click the checkbox:
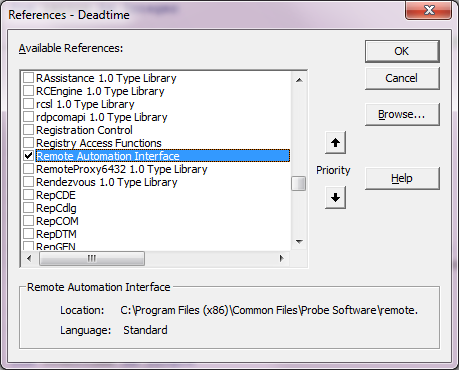
So run Excel "As Administrator", then (for example) open the Excel spreadsheet Deadtime_Acquire.xlsm. Then access the References dialog from Excel by clicking the Excel View menu, then clicking the Macros icon in the upper right, and then click "Step Into", then click the Tools | References menu.
It sounds complicated but if you're up to writing Excel macros, you should have no problems at all. Here's an recent example written by Ben Vos at the Belgian Nuclear Center to control the beam current on his SX100R using only the emission current (as opposed to the C1/C2 lenses):
http://probesoftware.com/smf/index.php?topic=1052.msg6964#msg6964

 All Electron Probe Micro-Analysts are welcome to register and post!