Author Topic: TDI Scanning for Carbon Contamination  (Read 6427 times)

Probeman

  • Emeritus
  • *****
  • Posts: 2856
  • Never sleeps...
    • John Donovan
TDI Scanning for Carbon Contamination
« on: May 24, 2017, 01:02:05 PM »
Recently a new TDI scanning feature was released in CalcImage originally for x-ray mapping of beam sensitive samples, but also as a possible solution for trace carbon measurement, particularly for correction of carbon contamination effects as described here:

http://probesoftware.com/smf/index.php?topic=41.msg5650#msg5650

I more recently made further measurements on pure Fe (a vacuum refined Fe with an unknown carbon content but certified oxygen content of 310 PPM and nitrogen of 10 PPM), to examine how well the TDI correction might work for correction of carbon contamination effects.

In point analyses, I obtained the following measurements utilizing the MAN background method (using Si and Fe for the carbon MAN calibration):

Un    4 Pure Fe TDI
TakeOff = 40.0  KiloVolt = 10.0  Beam Current = 50.0  Beam Size =    0

Un    4 Pure Fe TDI, Results in Elemental Weight Percents
 
ELEM:        C      Fe       N
BGDS:      MAN     MAN     MAN
TIME:    30.00   30.00   30.00
BEAM:    50.29   50.29   50.29

ELEM:        C      Fe       N   SUM 
    77    .083 100.153   -.167 100.070
    78    .089  99.925   -.196  99.818
    79   -.032 100.219   -.084 100.103

AVER:     .047 100.099   -.149  99.997
SDEV:     .068    .154    .058    .156
SERR:     .039    .089    .034
%RSD:   144.75     .15  -38.92
STDS:      506     526     604

TDI%:   -3.815    .150  -1.359
DEV%:      2.3      .2      .1
TDIF:  LOG-LIN LOG-LIN LOG-LIN
TDIT:    71.00   69.33   72.00
TDII:     5.71    137.    .481
TDIL:     1.74    4.92   -.732


Note the moderate TDI correction for carbon of -3.8 % which shows that the carbon contamination rate for this instrument (diffusion pumped SX100 with a 100 K cold trap) is not too bad.

Next I attempted to quantitatively map carbon (and iron and nitrogen) and discovered that it's not easy to find an area on my Fe std that is clean for carbon as seen here:


This was 10 replicate x-ray maps at 200 msec per pixel with 1 um pixels (continuous scan in X and step scan in Y), 10 keV and 50 nA. One can definitely see where carbon paint has been scattered over the material. But it's also nice to see that the nitrogen map is essentially all zero. 

I suspect that wiping the surface with ethanol might dissolve some epoxy and/or acrylic and therefore might be leaving a residue. It's not easy getting a carbon free surface in your typical EPMA lab!

Therefore, I've attempted to re-polish and re-clean the surface again without solvents and try again tonight...  but in the meantime here is a TDI plot of the carbon pixels (every 128th pixel) from the above x-ray map:


It appears that areas with low carbon (~zero) gain carbon, while areas with high carbon lose carbon, perhaps as it is volatized by the 50 nA beam?

I'd be interested to see results from others.  In fact, does anyone have an Fe standard that has a certified (zero or low) carbon content?
john
« Last Edit: April 13, 2020, 10:32:09 PM by John Donovan »
The only stupid question is the one not asked!

Probeman

  • Emeritus
  • *****
  • Posts: 2856
  • Never sleeps...
    • John Donovan
Re: TDI Scanning for Carbon Contamination
« Reply #1 on: May 25, 2017, 06:06:37 PM »
I cleaned and re-ran the pure iron again, and although there was some minor charging, the surface now appears much cleaner as seen here:


The TDI plot for every 512th pixel looks like this:


In case anyone else would like to try this themselves the steps are pretty simple. Here's a short tutorial for the TDI scanning quant mapping method:

1. In Probe Image define a stage (or beam) scan map (I used 10 keV, 50 nA, 200 msec/pixel and 1 um pixels for the map above but please feel free to experiment). Then when the mapping parameters are properly specified, simply click the Insert After button a number of times to create a bunch of replicate scans over the same area.

2. Acquire the replicate scans as usual.  The replicate scans will each have a consecutive number for each acquisition.

3. Now here's the new TDI specific steps:  In CalcImage, click the Window | Log Window menu and from the log window click the File | Convert Replicate PrbImg Files To TDI. Select the first replicate scan in the series. This allows the app to rename the replicate scans according to their TDI sequence number and save them to a \TDI sub folder. So you'll want to have each set of replicate TDI acquisitions (plus any non-replicate subsequent spectrometer pass elements for that same map area) in a separate folder since currently I only create a single \TDI sub folder for creating a new CalcImage project (though you could manually rename the \TDI sub folder them to something like "\TDI alloy" or "\TDI2" etc. to create additional projects).

I am hoping that eventually PI can have an "Acquire N Replicates" acquisition option that would automatically create the proper TDI naming sequence for the first pass elements, and then we could just skip this step (and the next step) entirely.

4. The app will next ask for any additional maps (not replicate scans because one should only acquire TDI scans on the first spectrometer pass elements) to copy into the \TDI sub folder.  If you have no subsequent (non-replicate) spectrometer pass maps, just click cancel.  The app will also copy any analog signal images in the folder to the \TDI sub folder.  This step is only to copy the remaining related maps into the \TDI sub folder so CalcImage will find them properly when creating a new quant project in the next step.

5. Now go back to the main CalcImage window and create a new quant mapping project as usual by specifying a PFE mdb file, sample setup and x-ray maps as usual.

6. Now check the parameters from the Project | Specify Quantitative Parameters! menu as usual, and then start the quantification using the Project | Calculate Quantitative Images menu as usual.

Voila!  Fully quantitative maps corrected for deadtime, background, matrix, interferences and *now* TDI effects for beam sensitivity and carbon contamination.   8)
john
« Last Edit: April 13, 2020, 07:14:28 PM by John Donovan »
The only stupid question is the one not asked!

Ben Buse

  • Professor
  • ****
  • Posts: 499
Re: TDI Scanning for Carbon Contamination
« Reply #2 on: May 30, 2017, 08:20:47 AM »
Hi John,

I've done steps 1-4. But got a bit lost on step 5.

For step 5 which prbimg files do I load. The original maps for the 1st pass. Or the TDI files from the TDI folder created.

Also how do you get the graph which shows the change in intensities between maps

Thanks

Ben

Probeman

  • Emeritus
  • *****
  • Posts: 2856
  • Never sleeps...
    • John Donovan
Re: TDI Scanning for Carbon Contamination
« Reply #3 on: May 30, 2017, 11:13:11 AM »
I've done steps 1-4. But got a bit lost on step 5.

For step 5 which prbimg files do I load. The original maps for the 1st pass. Or the TDI files from the TDI folder created.

Hi Ben,
Yeah, sorry.  It will be easier once Brian implements the replicate acquisition option in Probe Image.  Once he implements a replicate option in PI, the acquisition number will stay the same but each replicate will have a "TDI" sequence number.  That will then allow the TDI maps to be directly imported into CalcImage from the Create New Project menu (unless they are single line scans that you want to convert to two pixels. And in that case you'll still need to run that conversion on the single pixel scans before importing them into CalcImage).

To answer your question, when utilizing the Convert Replicate PrbImg Files To TDI menu, it first asks for a map from the TDI maps to convert, and then it also asks for any subsequent pass elements.  So once you've done that, all the PrbImg files you need to create a new project should already be in the \TDI folder.  The last version of PFE (CalcImage) also copies over the analog signal maps, so when using the Create New Project (Wizard), you should be able to proceed as usual.  That is select one map from the first pass elements (they will be TDI maps in your example).  Then select a map from the subsequent spectrometer pass elements.   Then click Cancel when done.

But if you want to load TDI maps that are a single line scan *and* then convert them to \TwoPixel maps using the new Convert One Pixel Scans To Two Pixels menu, you should select a map from the \TDI folder and it should convert all maps with the same "base name) to two pixels.  So in this case, when you create a new project in CalcImage, simply browse to the \TDI\TwoPixel folder to select the maps to load in!


Also how do you get the graph which shows the change in intensities between maps

You're asking about the "slice" feature here?

http://probesoftware.com/smf/index.php?topic=41.msg5993#msg5993

If so that is the "Slice" menu under the Project menu in CalcImage after the new new Convert One Pixel Scans To Two Pixels menu was utilized and a new project created.
john
« Last Edit: May 30, 2017, 11:54:30 AM by Probeman »
The only stupid question is the one not asked!

John Donovan

  • Administrator
  • Emeritus
  • *****
  • Posts: 3304
  • Other duties as assigned...
    • Probe Software
Re: TDI Scanning for Carbon Contamination
« Reply #4 on: May 31, 2017, 10:50:52 PM »
Hi Ben,
I found a problem in the JEOL conversion code for the convert one pixel to two pixel line scan feature. Once I fixed that (you can download v. 11.9.1 now), I was able to convert your line scan to two pixels and then quant it as seen here:


Then I used the output slice option to import it into Surfer as seen here:


Pretty reasonable for 1 sec per pixel.  I didn't see any TDI replicates- did you try that yet?  The scan parameters were 5 keV, 40 nA I think. Even without a TDI correction the carbon concentration is pretty close to zero, though slightly low in precision.  Your system and sample seem very clean.  Did you coat the sample?  If so, with what?  I think if you did 10 1 sec replicate scans, the precision would be a little better.  Here's the Si quant slice:


Very cool!
john
« Last Edit: April 13, 2020, 08:54:40 AM by John Donovan »
John J. Donovan, Pres. 
(541) 343-3400

"Not Absolutely Certain, Yet Reliable"

Ben Buse

  • Professor
  • ****
  • Posts: 499
Re: TDI Scanning for Carbon Contamination
« Reply #5 on: June 01, 2017, 07:05:39 AM »
Hi John,

Thanks I'll give that a go.

Regarding a graph I meant the following from your earlier post


The TDI plot for every 512th pixel looks like this:


« Last Edit: April 12, 2020, 10:10:56 PM by John Donovan »

John Donovan

  • Administrator
  • Emeritus
  • *****
  • Posts: 3304
  • Other duties as assigned...
    • Probe Software
Re: TDI Scanning for Carbon Contamination
« Reply #6 on: June 01, 2017, 08:28:15 AM »
Hi John,

Thanks I'll give that a go.

Regarding a graph I meant the following from your earlier post


The TDI plot for every 512th pixel looks like this:


Hi Ben,
Ok, I see.

It's the same deal as in Probe for EPMA, except that in CalcImage the app displays the TDI curves for pixels instead of for point analyses.

So from Probe for EPMA one clicks the Standard Assignments button in the Analyze! window, but in CalcImage one clicks the Standard Assignments button from the Specify Quantitative Parameters menu dialog from the Project menu.

From there it's the same dialog in both apps.  Just click the element row you want to see, then click the Display TDI Fit button.  In both apps you can display the Nth pixel or point in the TDI data, but in PFE the default is display every point, while in CalcImage it is displays every 32nd, 64th, 128th, 256th, 512th, etc. pixel, depending on the number of pixels in the image.


I was just remarking that the carbon line scans you sent did not appear to have any TDI replicate scans acquired so I could not perform a TDI correction on them.  I also note that since you utilized a "blank" correction for carbon, we cannot determine the carbon contamination rate without such a set of replicate scans.

In the carbon, nitrogen and iron line scans I did above on a vacuum refined pure iron sample, I acquired 10 replicates (line scans or maps) scans using 10 keV, 1 sec per pixel and 1 um pixels. The data I showed did not utilize the blank correction but appear to extrapolate back to zero time (and zero concentration) quite nicely...

Basically one needs to acquire "N" replicate scans in Probe Image and then use the Convert Replicate PrbImg Files to TDI menu from the CalcImage log window (see the Window menu in the main CalcImage window) to convert your replicate scans into "TDI" images that can be utilized in the CalcImage quantification to correct for changes in mapping intensities over time.  That is what is described in the first step of the tutorial above which I reproduce here again:

Quote
1. In Probe Image define a stage (or beam) scan map (I used 10 keV, 50 nA, 200 msec/pixel and 1 um pixels for the map above but please feel free to experiment). Then when the mapping parameters are properly specified, simply click the Insert After button a number of times to create a bunch of replicate scans over the same area.

2. Acquire the replicate scans as usual.  The replicate scans will each have a consecutive number for each acquisition.

3. Now here's the new TDI specific steps:  In CalcImage, click the Window | Log Window menu and from the log window click the File | Convert Replicate PrbImg Files To TDI. Select the first replicate scan in the series. This allows the app to rename the replicate scans according to their TDI sequence number and save them to a \TDI sub folder. So you'll want to have each set of replicate TDI acquisitions (plus any non-replicate subsequent spectrometer pass elements for that same map area) in a separate folder since currently I only create a single \TDI sub folder for creating a new CalcImage project (though you could manually rename the \TDI sub folder them to something like "\TDI alloy" or "\TDI2" etc. to create additional projects).

I am hoping that eventually PI can have an "Acquire N Replicates" acquisition option that would automatically create the proper TDI naming sequence for the first pass elements, and then we could just skip this step (and the next step) entirely.

4. The app will next ask for any additional maps (not replicate scans because one should only acquire TDI scans on the first spectrometer pass elements) to copy into the \TDI sub folder.  If you have no subsequent (non-replicate) spectrometer pass maps, just click cancel.  The app will also copy any analog signal images in the folder to the \TDI sub folder.  This step is only to copy the remaining related maps into the \TDI sub folder so CalcImage will find them properly when creating a new quant project in the next step.

5. Now go back to the main CalcImage window and create a new quant mapping project as usual by specifying a PFE mdb file, sample setup and x-ray maps as usual.

6. Now check the parameters from the Project | Specify Quantitative Parameters! menu as usual, and then start the quantification using the Project | Calculate Quantitative Images menu as usual.

When I first implemented this so called "Scanning TDI" correction in CalcImage, I thought it might work OK for beam sensitive samples, as you saw here:

http://probesoftware.com/smf/index.php?topic=912.0

In fact it worked way better than I might have hoped, for correction of alkali ion migration effects during x-ray mapping.  The fact that it actually corrects for the grid like pattern produced in the alkali images was a bit of a shock, but hey, we'll take it!   :D

But I wasn't at all sure how well it might work for dealing with carbon contamination for trace carbon measurements, but the preliminary data looks quite promising... 
« Last Edit: April 12, 2020, 10:00:12 PM by John Donovan »
John J. Donovan, Pres. 
(541) 343-3400

"Not Absolutely Certain, Yet Reliable"

John Donovan

  • Administrator
  • Emeritus
  • *****
  • Posts: 3304
  • Other duties as assigned...
    • Probe Software
Re: TDI Scanning for Carbon Contamination
« Reply #7 on: September 18, 2021, 10:39:33 AM »
Following up on the trace carbon mapping topic here on the Probe Image board:

https://probesoftware.com/smf/index.php?topic=609.msg10167#msg10167

Once probeman had properly acquired the X-ray maps in Probe Image, he proceeded to quantify the maps.

By the way, Probe Software is working on a new replicate X-ray map acquisition mode in Probe Image which will automatically acquire the replicate on-peak maps (for the TDI correction), and then once those on-peak replicates are acquired, it will automatically acquire the off-peak maps (if specified). This avoids any extra scans which would affect the carbon contamination rate. Obviously this is all moot if one is using the MAN background measurement method.

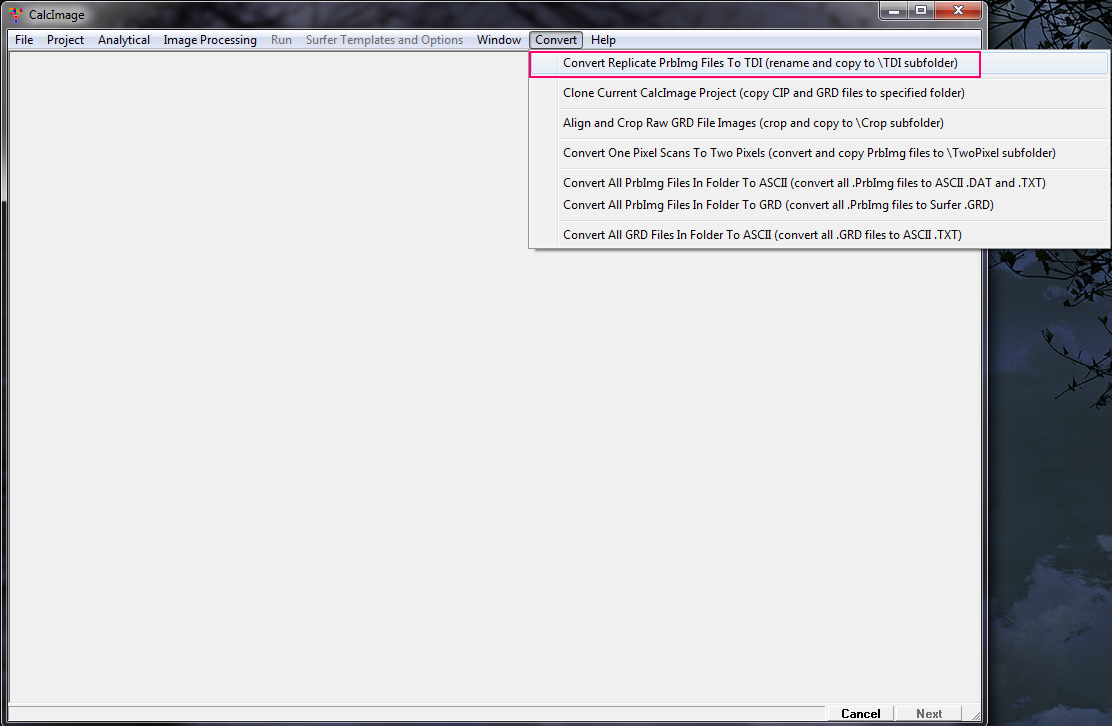
In the meantime, he first had to rename the replicate X-ray maps so that CalcImage knows these are intended for the TDI correction. That is done automatically using this Convert menu in CalcImage as shown here:


Once that is done he created a new project in CalcImage as usual by browsing to the /TDI sub folder and clicking on one map from each spectrometer pass. In this case the first pass for the 5 TDI elements and the second pass for the next 5 elements.

From the CalcImage Standard Assignments dialog we can now view the TDI intensities, here looking at carbon:


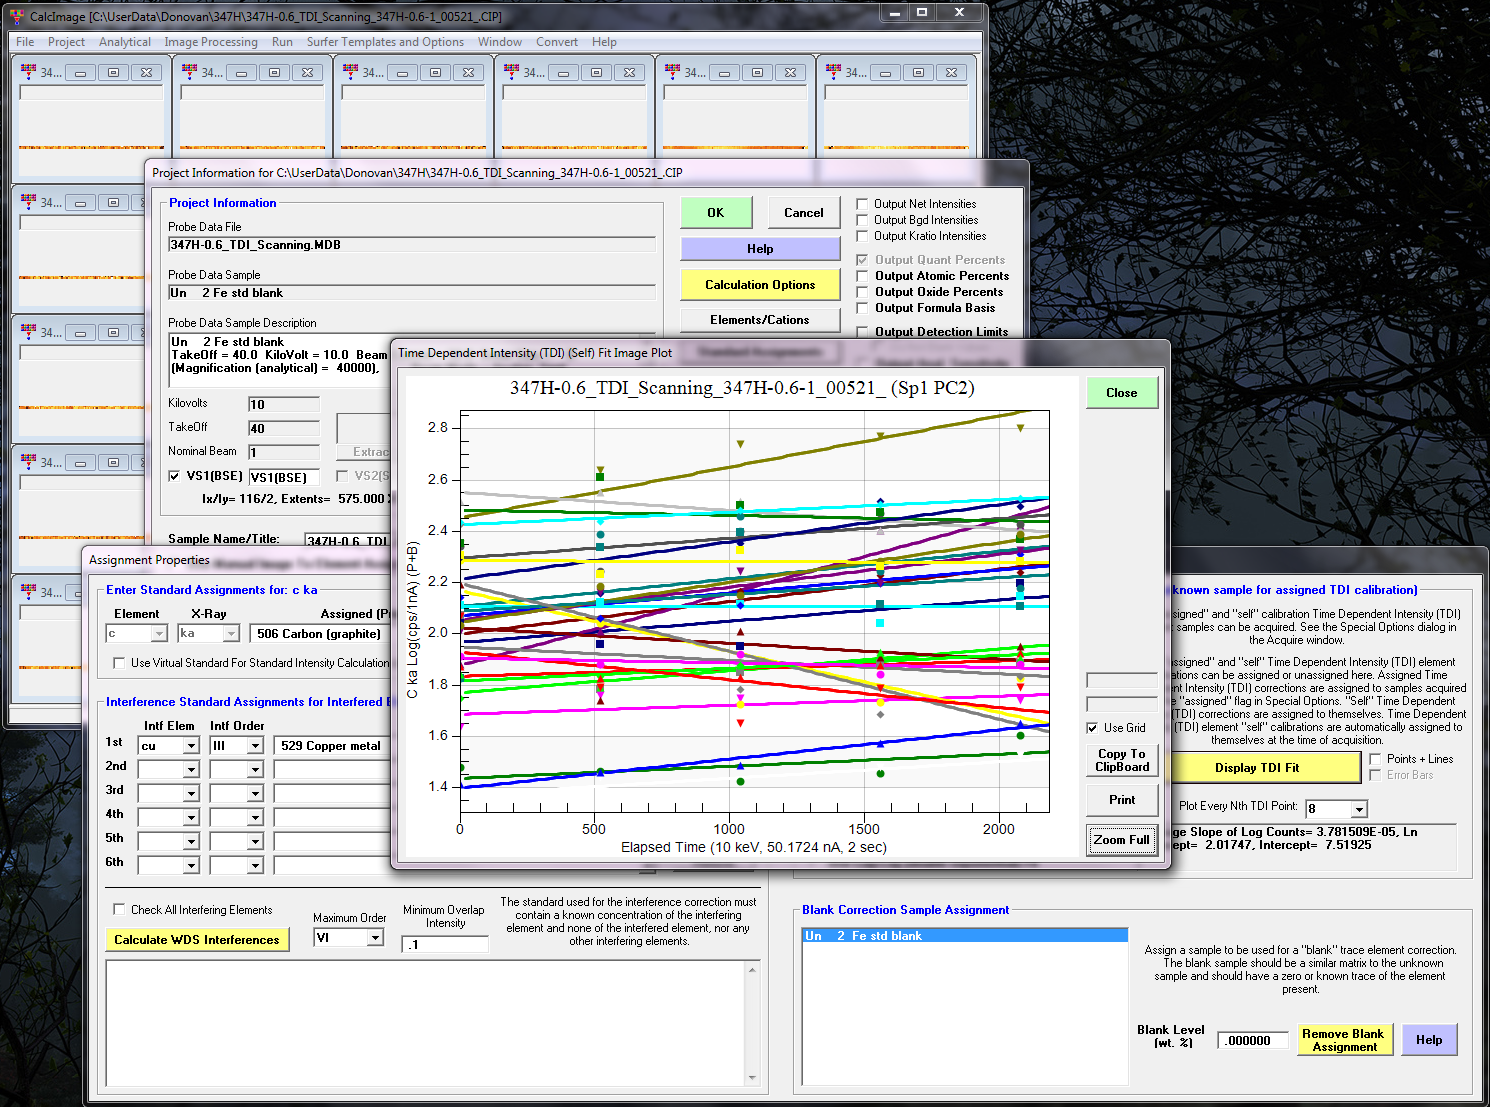
As we can see the intensity trend is slightly positive (using 5 2000 msec replicates over a total on-peak mapping time of about 40 minutes or so).

Please note that these maps were acquired with pixel dimensions of 116 x 2 pixels (X by Y) in order to more easily display the maps in Surfer which requires a minimum of 2 pixels in X and Y. Of course the JEOL stage would map in vertical direction so it would be 2 x 116 pixels (X by Y) in size for a JEOL stage map.  Also note that one can convert one pixel tall (or wide) maps using the Convert | Convert One Pixel Scans To Two Pixels menu in CalcImage.  This menu simply duplicates the 1 pixel dimension so the maps can be loaded into Surfer.

However, depending on the aspect ratio of the X-ray maps, one might need to adjust the displayed maps in Surfer.  So after the maps are quantified and opened in Surfer, they might need to modify the X and Y proportions and Y axis length as shown here:


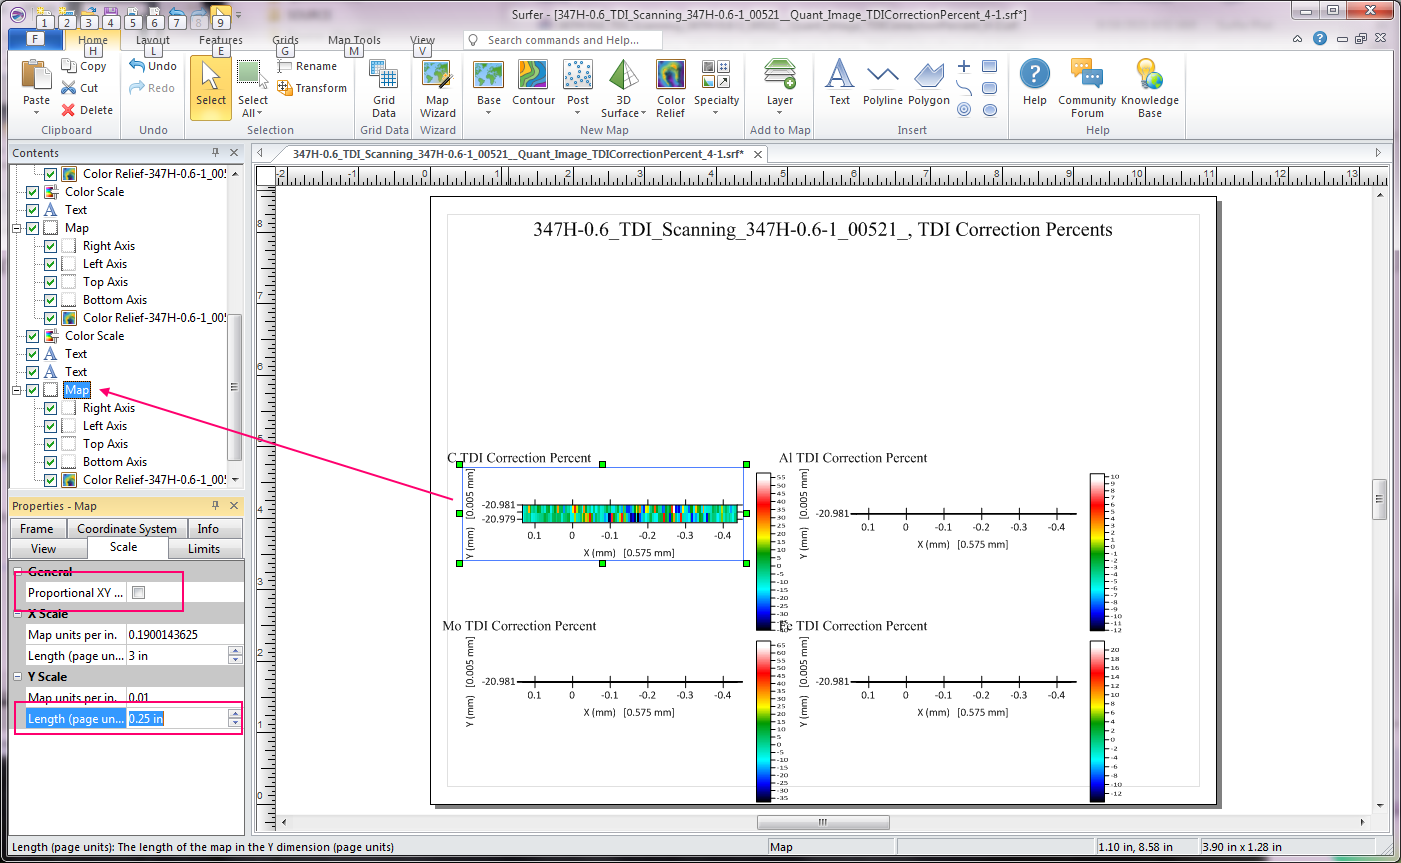
Here we are showing the TDI percent correction maps. Once all the axis lengths are adjusted we can see this:


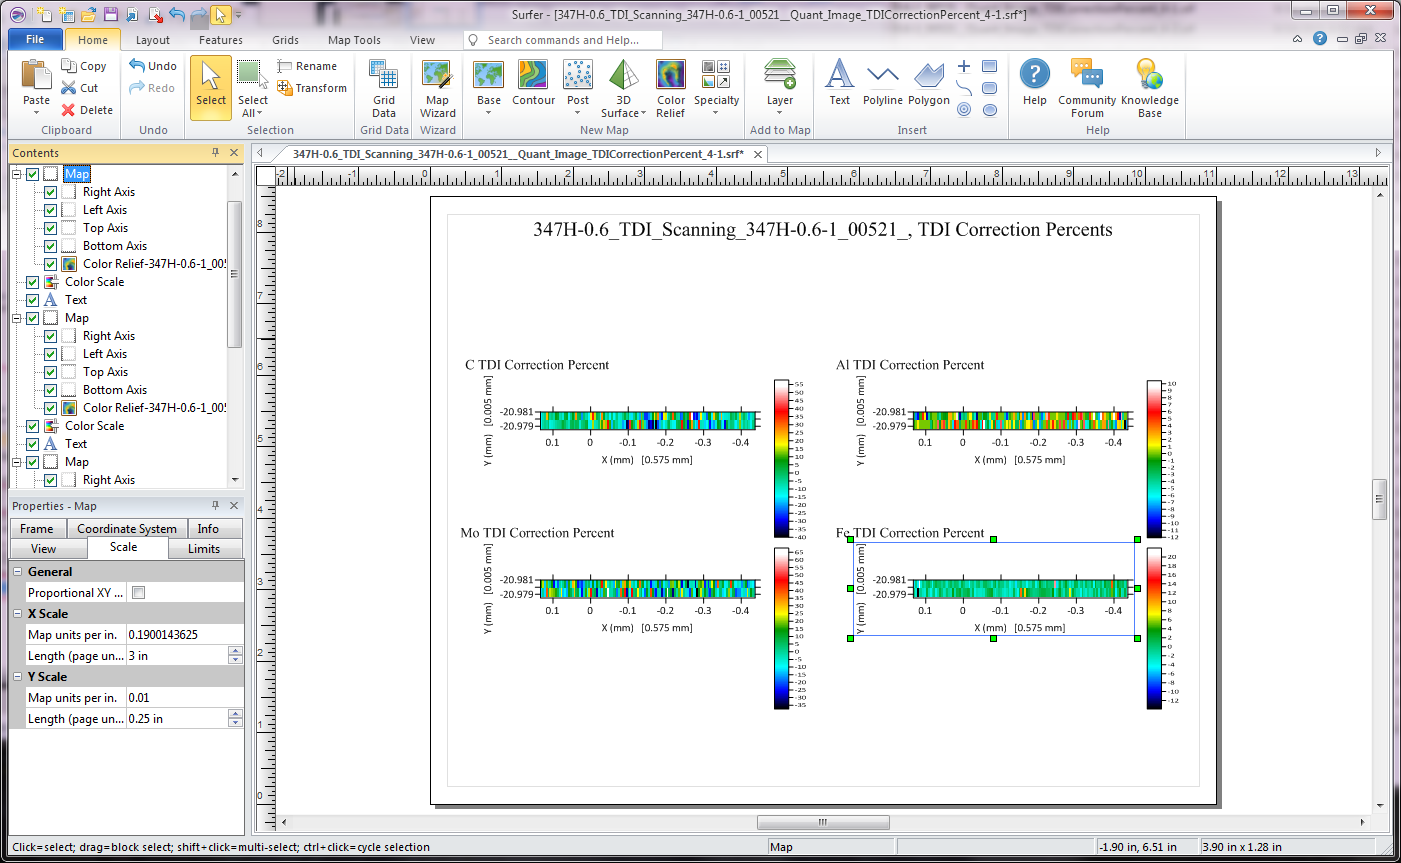
which reveals that the elements are all around a zero percent TDI correction with the exception of the carbon map, which is around minus 10% or so, with some variation at the single pixel level.  This could be due to the observed presence of scattered sub micron carbide grains.

Finally the TDI corrected (and blank corrected ) maps for carbon and three other elements.


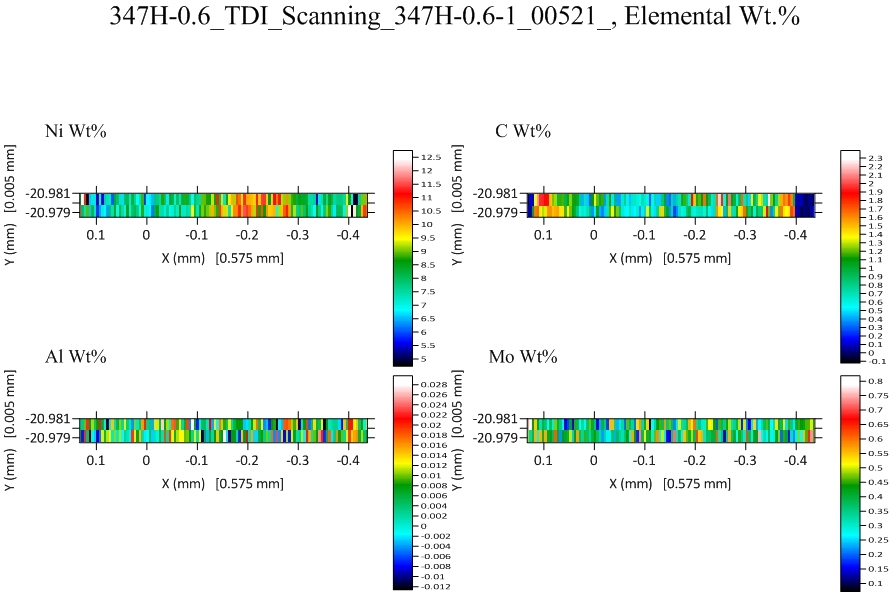
We can see that except for the edges of the sample, which consist of an oxidized zone, the average carbon concentration is around 0.5 wt% in the interior and also a slightly higher carbonized zone just at the oxide to metal transition on each side.
« Last Edit: September 18, 2021, 06:35:27 PM by John Donovan »
John J. Donovan, Pres. 
(541) 343-3400

"Not Absolutely Certain, Yet Reliable"