Author Topic: Tips and Tricks for PFE quant  (Read 28067 times)

John Donovan

  • Administrator
  • Emeritus
  • *****
  • Posts: 3275
  • Other duties as assigned...
    • Probe Software
Re: Tips and Tricks for PFE quant
« Reply #30 on: February 09, 2022, 09:01:06 AM »
Here's an interesting "trick".

Some of you may already utilize the Load Image button from the Imaging button (Acquire!) or the Digitize Image button (Digitize!) windows to load an image acquired using another software (e.g., JEOL, Cameca, Thermo, Bruker, etc. applications) into Probe for EPMA, for documentation or digitizing stage positions as described here:

https://probesoftware.com/smf/index.php?topic=42.msg9193#msg9193

The idea being that if the instrument is still at the same stage position and the same magnification (FOV) as when the loaded image was acquired, then the loaded image will be properly calibrated for the stage coordinates.

But it should be noted that one can load even images not acquired using a scanned beam, for example, an optical image from the light optics camera as seen here:


The only important thing to remember is to utilize the stage position from when the optical image was captured in the PeakSight software, and especially to set the electron optics FOV to a value that corresponds to the optical FOV.

On SX100/SXFive Cameca instruments the light optics FOV is variable, but since we use the 500 um FOV as the default optical zoom, that corresponds to about 800x magnification for the electron optics. Other optical FOVs can also be used to capture and load light optics images, just be sure to set the magnification of the instrument to the light optics FOV for proper stage calibration of the loaded images.
« Last Edit: February 09, 2022, 09:05:25 AM by John Donovan »
John J. Donovan, Pres. 
(541) 343-3400

"Not Absolutely Certain, Yet Reliable"

Probeman

  • Emeritus
  • *****
  • Posts: 2836
  • Never sleeps...
    • John Donovan
Re: Tips and Tricks for PFE quant
« Reply #31 on: April 12, 2022, 12:56:55 PM »
Here's a few tips for utilizing previously acquired standard intensities from other runs.

So normally we would create a new run, then maybe load the sample setup from a previous run that had similar elements/conditions using the Acquire! window New Sample/Setup button as seen here:


This will load not only the selected sample setup, but also all run (globals) specified in that run, and optionally all the standard intensities required for that specified sample setup.

This is a great way to get going quickly with a new run and of course the imported sample setup can be further modified and/or re-standardiazed.

The other more manual method to load standard intensities requires some preparation.  Some of you may already utilize the Save Element Setup feature in Probe for EPMA to save specific element setups to the public SETUP.MDB file, so that these element setups can be recalled later by any user.

What you may not have noticed is that if the sample is a standard it will also save the standard intensity for that element. But to streamline this method, one can simply utilize the Save Sample Setups as seen here from the Analyze! window:


This button will automatically search the sample and automatically output all element setups associated with that sample including the standard (and interference and MAN) standard intensities to the (several) element setup databases.  One click is all it takes!    8)

Once you have saved a number of element setups, you can import them into new runs using the button shown below. Personally when using this Load Element Setup dialog, I usually just load the element setups (without the standard intensities) and then re-acquire the standards, just to be sure to get up to date standard intensities.

But if desired, one can also load individual standard intensities using the button shown below.

« Last Edit: April 12, 2022, 12:59:18 PM by Probeman »
The only stupid question is the one not asked!

John Donovan

  • Administrator
  • Emeritus
  • *****
  • Posts: 3275
  • Other duties as assigned...
    • Probe Software
Re: Tips and Tricks for PFE quant
« Reply #32 on: June 07, 2022, 08:44:00 AM »
For this "tips and tricks" feature you will need the latest version of Probe for EPMA (as usual update from the Help | Update Probe for EPMA menu).

Sometimes a user will analyze for oxygen, but then later on would like to try simply calculating oxygen by stoichiometry.

However, if one goes into the Calculation Options dialog and clicks on the Calculate With Stoichiometric Oxygen option, they will get this warning:


To remedy this, just go to the Elements Cations dialog and first, disable the analyzed oxygen for quantification by clicking on the analyzed oxygen row, then checking the Disable Quant checkbox.

Next click on on an empty row in the Elements/Cations dialog and enter oxygen with no x-ray line (no x-ray line indicates an unanalyzed element).

Now, go back to the Calculations Options dialog and now you will be able to click the Calculate With Stoichiometric Oxygen option. After clicking the Analyze button you will now see output similar to this:

« Last Edit: June 07, 2022, 10:04:47 AM by John Donovan »
John J. Donovan, Pres. 
(541) 343-3400

"Not Absolutely Certain, Yet Reliable"

John Donovan

  • Administrator
  • Emeritus
  • *****
  • Posts: 3275
  • Other duties as assigned...
    • Probe Software
Re: Tips and Tricks for PFE quant
« Reply #33 on: January 18, 2023, 09:21:54 AM »
This is very much a beginner question, but I think it might help those who are just starting to use the Probe for EPMA software, because Probe for EPMA is designed completely differently than the JEOL and Cameca EPMA software.

The main point is that Probe for EPMA is intentionally designed from a "sample centric" perspective, while other EPMA software seems to be more designed from an "instrument centric" perspective. Basically when one looks at the Probe for EPMA software it appears to show a sample or samples. A sample being a collection of intensity or position data. The JEOL or Cameca software, on the other hand, appears (to me at least) to show the instrument more. Which makes sense to me because the JEOL and Cameca softwares were designed by instrument engineers, while Probe for EPMA was designed by scientists.

Basically, Probe for EPMA has two primary types of samples, each of which can contain zero to N data points. First, intensity samples (standards, unknowns and wavescans visible from the Acquire! and Analyze! windows), and second, position samples (standards, unknowns and wavescans visible from the Automate!, Digitize and Positions windows) that contain stage positions (and optionally sample conditions, setups, etc).  Here is a more detailed description:

The samples in Acquire! and Analyze! windows are intensity samples (with or without intensity data). The samples in the Automate! window are position samples (with or without position data). Once intensity samples have been created and intensity data acquired (in Acquire! manually or in Automate! automatically), these intensity samples can be viewed in the Analyze! window.

You can add position data for automated acquisition from the Automate! window using the Digitize button. When you add (stage) position data to samples in the Automate! they can then be automated and then the intensity data samples will appear in the Analyze! window for quantification.

The Acquire! window only works with the "current" or last intensity sample created (usually an unknown sample).  And the "current" sample can only be modified if it contains no intensity data (except changes for some background models, matrix corrections, software dead time, etc., etc.). So just create a new "current" sample if you want to change any acquisition conditions.

Remember, you cannot change sample conditions if the sample already contains intensity data (that would be unscientific!), but you can view the sample conditions from the Analyze! window using the Data, Elements/Cations and Conditions buttons.
« Last Edit: January 18, 2023, 02:32:46 PM by John Donovan »
John J. Donovan, Pres. 
(541) 343-3400

"Not Absolutely Certain, Yet Reliable"

John Donovan

  • Administrator
  • Emeritus
  • *****
  • Posts: 3275
  • Other duties as assigned...
    • Probe Software
Re: Tips and Tricks for PFE quant
« Reply #34 on: January 18, 2023, 05:28:35 PM »
Basically, Probe for EPMA has two primary types of samples, each of which can contain zero to N data points. First, intensity samples (standards, unknowns and wavescans visible from the Acquire! and Analyze! windows), and second, position samples (standards, unknowns and wavescans visible from the Automate!, Digitize and Positions windows) that contain stage positions (and optionally sample conditions, setups, etc). 

Sometimes the shortest explanation is the best explanation!

This is what one of our installers wrote to me on how they explain it:

- Acquire is where you tell it what to do.
- Automate is where you tell it where to do it.
- Analyze is where you look at what it did.

 8)
« Last Edit: January 19, 2023, 05:28:18 AM by Owen Neill »
John J. Donovan, Pres. 
(541) 343-3400

"Not Absolutely Certain, Yet Reliable"

Ben Buse

  • Professor
  • ****
  • Posts: 488
Re: Tips and Tricks for PFE quant
« Reply #35 on: January 24, 2023, 03:14:07 AM »
My version on Owen,

-Acquire is where you create setup (with option of insitu acquistion, and record of all positions)
-Automate is where you automate
-Analyze is where you review standards and unknown results

Anette von der Handt

  • Global Moderator
  • Professor
  • *****
  • Posts: 351
    • UMN Probelab
Re: Tips and Tricks for PFE quant
« Reply #36 on: June 09, 2023, 06:02:19 PM »
How to quickly add a custom list of standards to a run

If you have a longer and disjointed list of standards that need to be frequently added to a run, here is a good trick.


1. In the Automate! window, first select all the standards that need to be added. Then, export this selection to a position list.


2. Go to your "Standard Assignments" and "Add/Remove" standards and load in this .pos file.


3. Admire that it only took you two mouse clicks to get all your standards into your run. This can be very useful for situations where a file setup load is not desired but I want users (or myself) give easy access to a curated list of standards.
Against the dark, a tall white fountain played.

Anette von der Handt

  • Global Moderator
  • Professor
  • *****
  • Posts: 351
    • UMN Probelab
Re: Tips and Tricks for PFE quant
« Reply #37 on: June 14, 2023, 05:41:37 PM »
Duplicate positions as unknowns or wavescans

Maybe not so much a trick, just a well hidden function. PFE distinguishes three different position "types": standard, unknown and wavescans. Did you know that you can use one set of positions (like standards) to a create a different type (like wavescans). It not only copies over the X,Y,Z positions but also the comment name.

For this you need to get to the Positions window, which is accessible either through the "Digitize positions" dialog (in Automate!)


or through the Move window (in Acquire!). You can find the Move window in Acquire!


In the positions dialog, you can duplicate any position as either "unknown" or "wavescan" position.


How do I use/abuse this function?
1) Standard evaluation: When I have a new standard block, I can easily set up wavescans for all standards after recording the standard locations. And they all have the proper comment name.

2) Changing the order of blocks of unknown positions. For example, I decide I want to run all positions in sample three first and not last, I just duplicate the positions in the order I would like to run them and delete the old one (or just not select them)

3) Create perfectly parallel traverses by setting up the first traverse, duplicate it as many times as needed and then use the update function in Acquire! to shift them around.

I am sure there are many other. By the way, this dialog is also where you can also shift positions by an increment.
Against the dark, a tall white fountain played.

Anette von der Handt

  • Global Moderator
  • Professor
  • *****
  • Posts: 351
    • UMN Probelab
Re: Tips and Tricks for PFE quant
« Reply #38 on: June 15, 2023, 04:06:34 PM »
Shift positions with Update

In case not everyone is aware of this trick (and it plays well with the Duplicate tip from my last post): The Update function in the Acquire window shifts all positions in same unknown based on the current stage position. So, usually the first position gets updated with the current stage position and all following positions get shifted by the same relative shift in X/Y/Z. This is great to update standard positions for example.

Not everyone may know that this can be applied to any position in your unknown.


If I have a traverse going across a large grain and I want to make sure that I hit the core of the grain exactly, I will select the halfway position in my traverse, go to my desired location at the grain center and hit update. So, you can really select any point as the reference for your "Update" and the possibilities are endless if you want to quickly shift sets of positions (traverses, grids) around.
« Last Edit: June 15, 2023, 04:21:09 PM by Anette von der Handt »
Against the dark, a tall white fountain played.

John Donovan

  • Administrator
  • Emeritus
  • *****
  • Posts: 3275
  • Other duties as assigned...
    • Probe Software
Re: Tips and Tricks for PFE quant
« Reply #39 on: June 15, 2023, 09:49:39 PM »
And to add further to Anette's post above, if you want to only update a single position, simply select the position and use the mouse right click to select the update single position menu as shown here:

John J. Donovan, Pres. 
(541) 343-3400

"Not Absolutely Certain, Yet Reliable"

Anette von der Handt

  • Global Moderator
  • Professor
  • *****
  • Posts: 351
    • UMN Probelab
Re: Tips and Tricks for PFE quant
« Reply #40 on: June 21, 2023, 11:19:16 AM »
And another addendum, regarding the order of unknown or wavescan positions in the position list: You can reorder them using the little arrows although only one by one. For larger batches, I use the duplicate function as described in my earlier post.

Against the dark, a tall white fountain played.

Anette von der Handt

  • Global Moderator
  • Professor
  • *****
  • Posts: 351
    • UMN Probelab
Re: Tips and Tricks for PFE quant
« Reply #41 on: June 21, 2023, 12:34:12 PM »
Using varying numbers of standard positions during an automated standard acquisition run

PFE allows to easily change the absolute number of standard positions run during a standard intensity acquisition through the "Standard Points to Acquire" field in Automate!. But what if I want to vary them  within my standard run?

A trick is to set the checkmark for "Use Only Digitized Standard Positions" in the Acquisition Options dialog. Then add/delete positions for each standard to match what your desired positions count is and set the value for "Standard Points to Acquire" to the highest value. So if you set that value to 15 and one standard has 15 positions but all the other ones have 7, then this is exactly what will run.

Against the dark, a tall white fountain played.

Probeman

  • Emeritus
  • *****
  • Posts: 2836
  • Never sleeps...
    • John Donovan
Re: Tips and Tricks for PFE quant
« Reply #42 on: November 30, 2023, 08:31:59 AM »
...The other more manual method to load standard intensities requires some preparation.  Some of you may already utilize the Save Element Setup feature in Probe for EPMA to save specific element setups to the public SETUP.MDB file, so that these element setups can be recalled later by any user.

What you may not have noticed is that if the sample is a standard it will also save the standard intensity for that element. But to streamline this method, one can simply utilize the Save Sample Setups as seen here from the Analyze! window:


This button will automatically search the sample and automatically output all element setups associated with that sample including the standard (and interference and MAN) standard intensities to the (several) element setup databases.  One click is all it takes!    8)

Once you have saved a number of element setups, you can import them into new runs using the button shown below. Personally when using this Load Element Setup dialog, I usually just load the element setups (without the standard intensities) and then re-acquire the standards, just to be sure to get up to date standard intensities.

But if desired, one can also load individual standard intensities using the button shown below.


I should add that this button is only available from the Elements/Cations dialog from the Analyze! window as shown here:


Now normally I just use the Load File Setup button to load a sample setup from an old run (usually without the standard intensities and then re-run the standards to get appropriate intensities), but once in a great while, I'll want to try a specific standard intensity from an old run (that was saved to the element setup database) and then this feature can be useful. 

For example, maybe the filament died and I just needed to quickly acquire another standard or two for some trace elements:

https://probesoftware.com/smf/index.php?topic=610.msg11752#msg11752

Remember, for trace elements, the primary standard intensity is the *least* important parameter!
« Last Edit: November 30, 2023, 08:43:18 AM by Probeman »
The only stupid question is the one not asked!

JonF

  • Professor
  • ****
  • Posts: 149
Re: Tips and Tricks for PFE quant
« Reply #43 on: March 14, 2024, 04:04:22 AM »
I was collecting some data last weekend on our JEOL 8530F simultaneously using WDS and our JEOL EDS in PfE. I wasn't really using the EDS, but I always collect the data just in case I might need it later on.
 
On reviewing the weekend run, I noticed that one of the WD spectrometers decided to start misbehaving part way through the analysis. Unfortunately, this was a major element and was consequently throwing the totals all over the place.

"No problem" thought I, "I'll just switch to using the EDS instead". Unfortunately, that particular element had a horrendous interference from another major element and whilst I could use the EDS data, I'd rather just do that particular element by difference.

I duly disabled the problematic element in the Elements/Cations option in the 
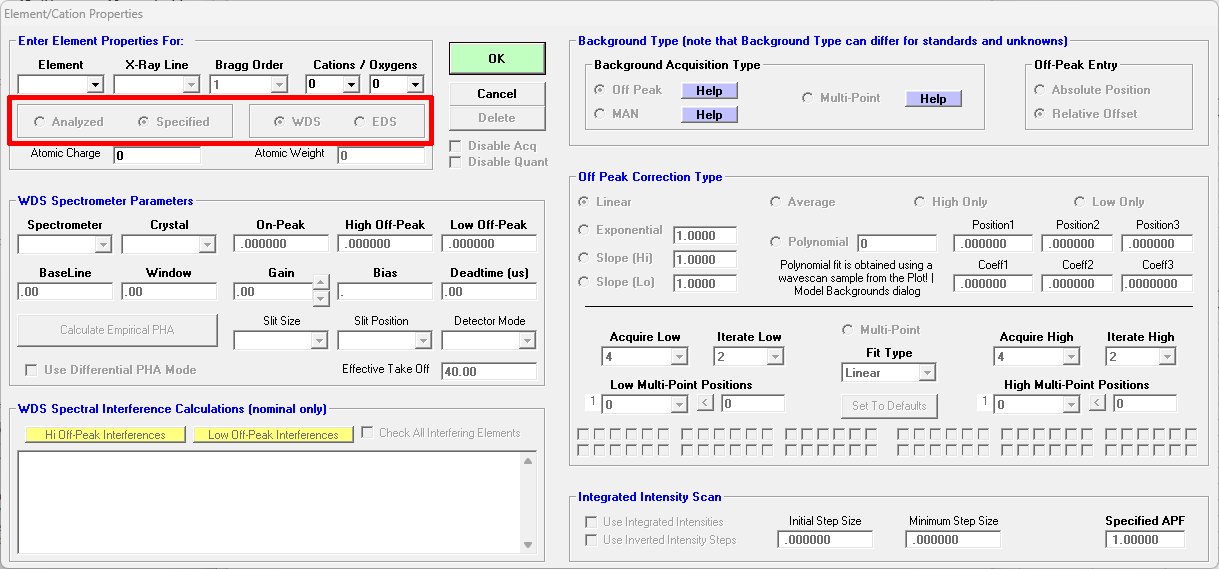
Analyze! window, and went to add this element back in (so that I could specify the element by difference). When the Element/Cation Properties window first loaded, the radio buttons for Analyzed vs Specified were greyed out (i.e. unselectable), with Specified selected by default. The WDS option was also selected but greyed out, with EDS selectable but unselected:


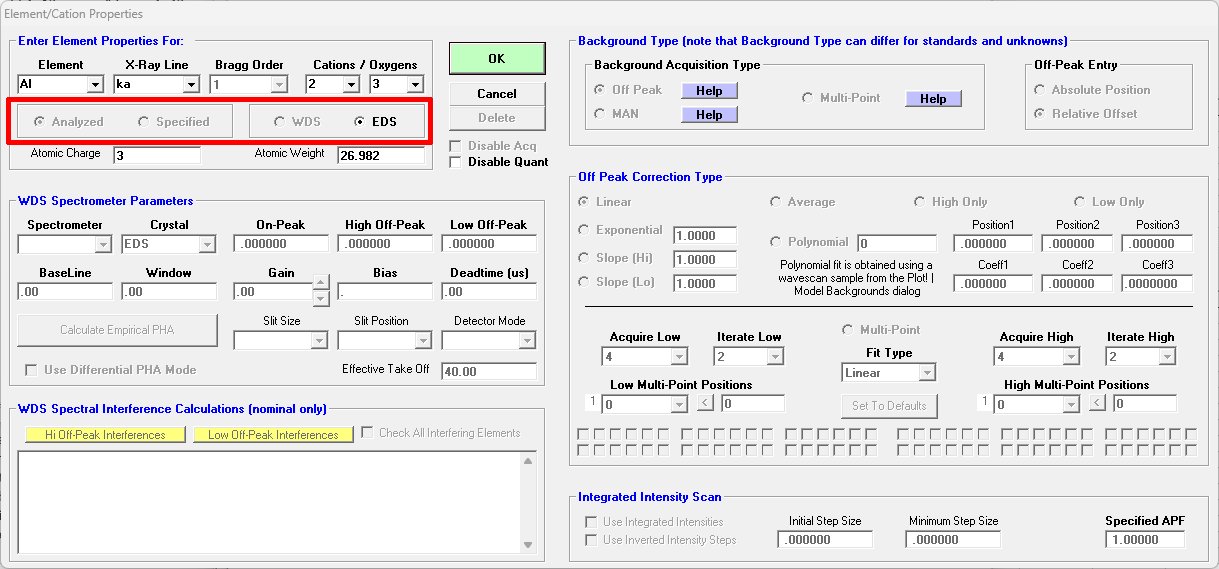
As soon as I either typed an element in to the Element box, or selected an element from the drop down, the radio buttons jumped from Specified to Analyzed and from WDS to EDS, and I couldn't revert back as all the options were unselectable!:


As I didn't want to analyze this element by EDS (or WDS), but I wanted to specify this element by difference, what I had to do was scroll down to the bottom of the X-Ray Line list and select the blank space:


This then jumped the radio button selection back to 
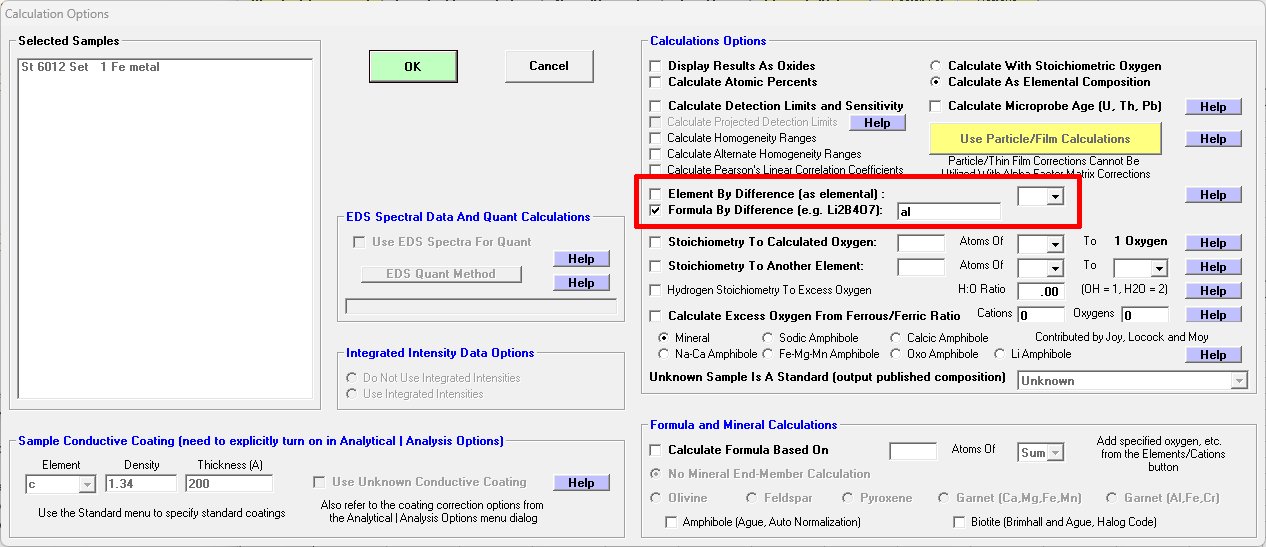
Specified and allowed me to select this element from the Element By Difference (as elemental) drop down menu in the Calculation Options window from the Analyze! window. Hurrah!

It also turns out there's an even easier way to do this! Instead of going through the rigmarole of adding the element to the list of elements in the Element/Cations window, I could simply have disabled the troublesome element and added it back in via the Formula By Difference (e.g. Li2B4O7) text entry box in the Calculation Options window in Analyze!:

« Last Edit: March 18, 2024, 08:55:20 AM by JonF »