Author Topic: PictureSnap Tips and Tricks  (Read 27095 times)

John Donovan

  • Administrator
  • Emeritus
  • *****
  • Posts: 3275
  • Other duties as assigned...
    • Probe Software
PictureSnap Tips and Tricks
« on: July 07, 2013, 11:16:51 AM »
When calibrating your imported image file in PictureSnap, it's usually easier to first select two diagonally oriented features to get the picture calibrated for translation and scale.

After you have calibrated the picture for two points, simply select a 3rd calibration point roughly on the corner of a triangle including the two original calibration points, and drive to the approximate stage position of this third calibration point by double-clicking the picture.

Then select the "Three Points" calibration option (the image will now be listed as "Image Is Uncalibrated") and after manual X/Y stage adjustment of the third point feature, read the stage coordinates and select the picture coordinates.

Then click the Calibrate Picture button and the picture will now be calibrated for image rotation.

To further calibrate the imported PictureSnap image for Z stage tilt, simply use the Move To buttons for each calibration point to drive to that stage position, adjust the stage Z, then click the Read Current Stage Coordinate button. After all three points have been confirmed for Z focus, just click the Calibrate Picture button *again* and your picture is now calibrated for Z stage tilt in addition to image rotation.
« Last Edit: April 24, 2016, 12:44:41 PM by John Donovan »
John J. Donovan, Pres. 
(541) 343-3400

"Not Absolutely Certain, Yet Reliable"

Gseward

  • Global Moderator
  • Professor
  • *****
  • Posts: 134
Re: PictureSnap Tips and Tricks
« Reply #1 on: July 17, 2013, 12:42:56 PM »
John,

I often use my flatbed scanner to scan an image of the complete sample shuttle (either 4x thin sections or 6x 25mm rounds). I then use reference marks marked on my shuttle to calibrate the image; these are very fast to locate (because +/_  a few um, they are always in the same place!) and allow me to calibrate multiple sample locations all at once. Only problem with this is the z calibration is not in the plane of the sample surface. For this reason, it might be useful if the Z coordinate was also displayed, so it could be manually edited??

gareth

Gseward

  • Global Moderator
  • Professor
  • *****
  • Posts: 134
Re: PictureSnap Tips and Tricks
« Reply #2 on: July 17, 2013, 01:59:52 PM »

John

Would it be feasible to allow multiple PictureSnap windows to run simultaneously? This would be very useful for using overview and detailed images concomitantly.  I know it is possible to run Stage! and PictureSnap together to achieve the same thing, but setting-up PictureSnap is more efficient.


Gareth

John Donovan

  • Administrator
  • Emeritus
  • *****
  • Posts: 3275
  • Other duties as assigned...
    • Probe Software
Re: PictureSnap Tips and Tricks
« Reply #3 on: July 18, 2013, 09:25:36 AM »
I often use my flatbed scanner to scan an image of the complete sample shuttle (either 4x thin sections or 6x 25mm rounds). I then use reference marks marked on my shuttle to calibrate the image; these are very fast to locate (because +/_  a few um, they are always in the same place!) and allow me to calibrate multiple sample locations all at once. Only problem with this is the z calibration is not in the plane of the sample surface. For this reason, it might be useful if the Z coordinate was also displayed, so it could be manually edited??

Good idea. I can do that but you'll have to remember to click the Calibrate Image button if you edit them manually.
John J. Donovan, Pres. 
(541) 343-3400

"Not Absolutely Certain, Yet Reliable"

John Donovan

  • Administrator
  • Emeritus
  • *****
  • Posts: 3275
  • Other duties as assigned...
    • Probe Software
Re: PictureSnap Tips and Tricks
« Reply #4 on: July 18, 2013, 09:29:53 AM »
Would it be feasible to allow multiple PictureSnap windows to run simultaneously? This would be very useful for using overview and detailed images concomitantly.  I know it is possible to run Stage! and PictureSnap together to achieve the same thing, but setting-up PictureSnap is more efficient.
PictureSnap is designed to allow a resizable full view and 1:1 pixel mapping at the same time. So if your scan is very high resolution, you can see the whole thing using the Full Image Picture View menu and then see the detail using the regular PictureSnap window.
John J. Donovan, Pres. 
(541) 343-3400

"Not Absolutely Certain, Yet Reliable"

John Donovan

  • Administrator
  • Emeritus
  • *****
  • Posts: 3275
  • Other duties as assigned...
    • Probe Software
Re: PictureSnap Tips and Tricks
« Reply #5 on: July 31, 2013, 12:31:23 PM »
So here is a cool example of importing a CL image from our Quanta SEM and importing it into PFE's PictureSnap feature while the sample was loaded in the EPMA. 

There was considerable sample rotation, ~10 degrees from the student not being especially careful, but first the two point calibration was performed, then the third point was added to correct for rotation and the PFE analysis positions line up exactly where they were digitized in the EPMA for both the probe BSE and the SEM CL images.
« Last Edit: August 16, 2013, 11:30:38 AM by John Donovan »
John J. Donovan, Pres. 
(541) 343-3400

"Not Absolutely Certain, Yet Reliable"

John Donovan

  • Administrator
  • Emeritus
  • *****
  • Posts: 3275
  • Other duties as assigned...
    • Probe Software
Re: PictureSnap Tips and Tricks
« Reply #6 on: August 01, 2013, 12:21:15 PM »
Here's another tip for PictureSnap:

To display your currently digitized coordinates (position samples listed in the Automate! window), use the Display menu from the PictureSnap window.

To display your currently acquired coordinates (std, unk or wav samples listed in the Analyze! window), use the Run menu from the main PFE window. This also works in data reprocessing mode when not connected to the instrument.
John J. Donovan, Pres. 
(541) 343-3400

"Not Absolutely Certain, Yet Reliable"

John Donovan

  • Administrator
  • Emeritus
  • *****
  • Posts: 3275
  • Other duties as assigned...
    • Probe Software
Re: PictureSnap Tips and Tricks
« Reply #7 on: November 02, 2013, 01:39:44 PM »
This is mainly a tip for Cameca users, but in any event you've all probably noticed that the default installation of Probe for EPMA and CalcImage assumes a JEOL stage orientation. This is simply because most EPMA instruments "out there" are JEOL instruments!

For Cameca users, that means when you install PFE for off-line data and image re-processing you will be loading Cameca oriented images into an "assumed" JEOL stage orientation. What will this look like?  Well, your Cameca micron stage units will be converted to mm as seen here, and another thing: the image is "flipped"!:


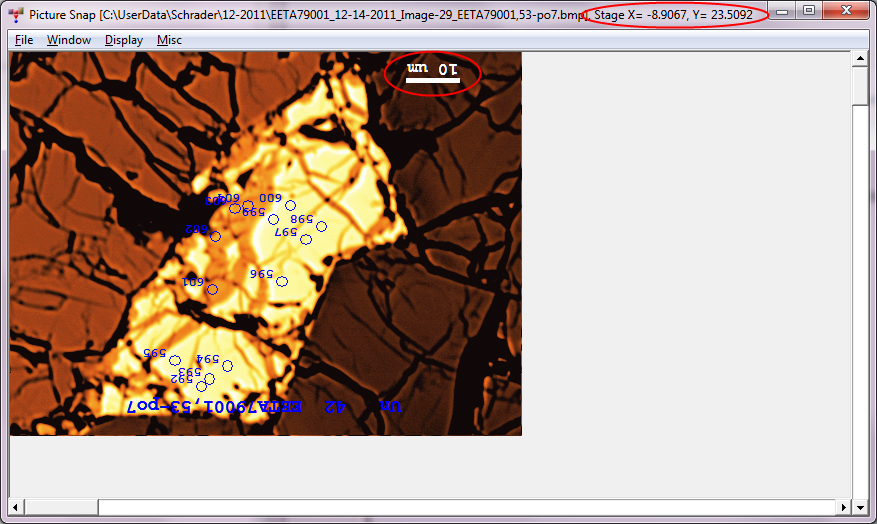
Obviously something is wrong!  Yes, in converting from Cameca to JEOL coordinates systems, not only did the units change from um to mm, but the stage orientation changed from Cameca Cartesian orientation to JEOL "anti-cartesian" orientation!

To see your stage units in microns again, and the image properly oriented, as seen here:


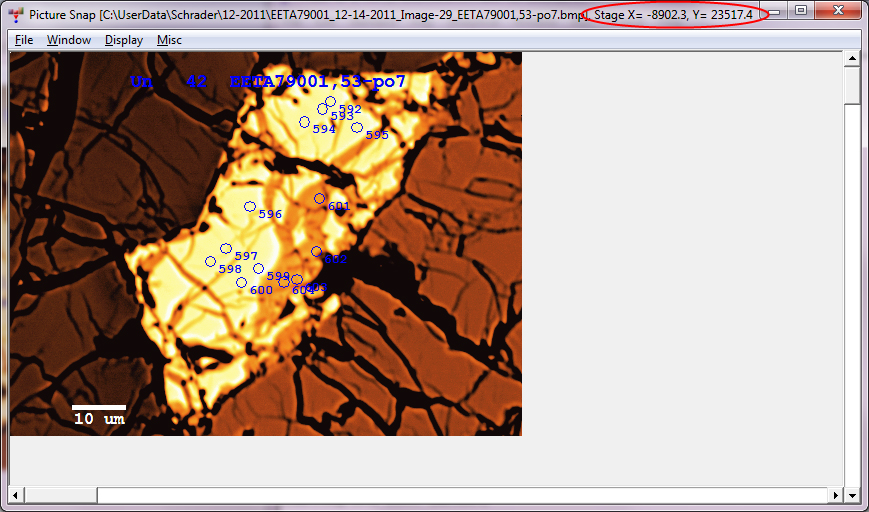
you'll need to copy some Probe for EPMA config files over from your on-line instrument computer to the off-line re-processing computer as described in this post which is linked here (note this only has to be done once for each off-line re-processing computer or whenever you update your standard composition database, Standard.mdb):

https://probesoftware.com/smf/index.php?topic=76.msg280#msg280

Actually for the purposes of this post, a Cameca user really only needs to copy over the following files, but it doesn't hurt to make a back up of the other files:

Probewin.ini
motors.dat
scalers.dat
crystals.dat
standard.mdb


« Last Edit: August 24, 2018, 10:34:10 AM by John Donovan »
John J. Donovan, Pres. 
(541) 343-3400

"Not Absolutely Certain, Yet Reliable"

John Donovan

  • Administrator
  • Emeritus
  • *****
  • Posts: 3275
  • Other duties as assigned...
    • Probe Software
Re: PictureSnap Tips and Tricks
« Reply #8 on: November 21, 2013, 04:07:35 PM »
Here's a cute trick for digitizing points at low mag in PFE (use the Confirm Positions options in the Automate! window later to get the z focus exact!), using either an imported low mag SEM image, flat bed scanner image or even an analog (SE, BSE) image acquired and then exported from PFE.

The SEM or flat bed scanner image will need to be calibrated using the instructions here:

https://probesoftware.com/smf/index.php?topic=14.msg28#msg28

though the exported PFE image will already have a calibration, so it's even easier. Simply export a low mag image using the Save As BMP button as seen here:


and then import into PictureSnap as seen here:


and then you can use this menu to digitize points for acquisition using this menu:


Finally, use the Display menu in PictureSnap to see the points as you digitize them and then using the right mouse, click on the approximate positions desired for acquisition on the PictureSnap image:


Be sure to confirm them for proper position and exact z stage focus from the Automate! window prior to acquisition!
« Last Edit: August 24, 2018, 10:34:44 AM by John Donovan »
John J. Donovan, Pres. 
(541) 343-3400

"Not Absolutely Certain, Yet Reliable"

Paul Carpenter

  • Professor
  • ****
  • Posts: 46
    • Washington University Analytical Facilities
Re: PictureSnap Tips and Tricks
« Reply #9 on: December 09, 2013, 10:29:49 AM »
John,

Maybe I have missed documentation somewhere.  I am seeing two issues with Picturesnap when trying to load larger images.

All images we use are jpg images

1. If the image is "way too big" there is an out of memory error
2. If the image is large, then only a portion of the image is loaded into PS

It would be preferable to know in advance what the pixel limitations are if that is possible, or to have PFE tell me that an image is too large for loading and will be clipped.

I am seeing the clipping of the image for images that are, for example, 3000x4000 or so.  We previously limited images to 2kx2k but you told me very large images can be loaded, so we tried.

I don't view the clipping as a feature, and I am pretty sure all users would prefer to have the image loaded in entirety or have a message explaining why it could not be loaded.

The other issue is that I have users who show up with jpg images but they are 24 bit deep.  Is there a limitation on bit depth with jpgs?

Cheers,

Paul
Paul Carpenter
Washington University St. Louis

Paul Carpenter

  • Professor
  • ****
  • Posts: 46
    • Washington University Analytical Facilities
Re: PictureSnap Tips and Tricks
« Reply #10 on: December 10, 2013, 07:15:15 AM »
After off-line discussion with Donovan I now see issues that likely will affect users:

1. It is video memory that is used for Picturesnap images. If your PC has only basic video graphics or an older card (our PFE computer has an ATI FireGL v7200 which has "only" 256 mb of video ram) then I suppose it is possible to run out of memory with a large PS image. We are running two monitors at 2560x1600 and 1920x1080 all the time.

2. Is is possible to calculate the size of the image one is trying to load and open a dialog when the image is clipped for the normal window and also to avoid the out of memory error with an informative dialog that shows the size of the image trying to load and the available video memory (is is possible to determine the amount of video memory available).

Users tend to come to the lab with very large scanned images or mosaics that have not been downsampled but the sheer size is usually apparent from inspection. It seems like having a video card with 1 gb or more video memory would be a good upgrade for users.

Paul

Edit by John: Unfortunately the Microsoft call only returns "OK" or the error number, no other information. Did you try opening the Full View window from the PictureSnap menu? Your best bet is to get a video card with more memory as you stated above, but I've also been able to load bigger images by reducing the video card display mode to 16 bit color depth. See comments in attached FAQ.
« Last Edit: December 10, 2013, 08:58:35 AM by John Donovan »
Paul Carpenter
Washington University St. Louis

Philipp Poeml

  • Professor
  • ****
  • Posts: 219
Re: PictureSnap Tips and Tricks
« Reply #11 on: April 18, 2016, 07:56:24 AM »
A question, John:

I use Picture Snap on my online PC and I display "currently acquired coordinates" and it works just fine. I took the file and went to my offline PC, and there the displayed points do not line up with the image any more. They are shifted. Why is that? Are there any ini files that might be different? Is it not just comparing the jpg calibration coordinates with the analyzed positions coordinates?

John Donovan

  • Administrator
  • Emeritus
  • *****
  • Posts: 3275
  • Other duties as assigned...
    • Probe Software
Re: PictureSnap Tips and Tricks
« Reply #12 on: April 18, 2016, 06:02:51 PM »
A question, John:

I use Picture Snap on my online PC and I display "currently acquired coordinates" and it works just fine. I took the file and went to my offline PC, and there the displayed points do not line up with the image any more. They are shifted. Why is that? Are there any ini files that might be different? Is it not just comparing the jpg calibration coordinates with the analyzed positions coordinates?

Hi Philipp,
Yes, it should work.

I've tested this issue some time ago on different monitors and it seemed to work, but maybe the monitors you used have different DPI values?  I'm not sure what could cause this honestly.  I've sort of standardized on 24" monitors in my lab which makes this issue hard to test.  I know the PictureSnap calibration works for sure if the monitors are the same.  I will look into it again though just to double check.

You can try exporting the config files on your off-line computer from the File | Export Configuration menu in PFE, but all necessary values should already be stored in the MDB file.
« Last Edit: April 18, 2016, 06:10:23 PM by John Donovan »
John J. Donovan, Pres. 
(541) 343-3400

"Not Absolutely Certain, Yet Reliable"

Philipp Poeml

  • Professor
  • ****
  • Posts: 219
Re: PictureSnap Tips and Tricks
« Reply #13 on: April 19, 2016, 03:36:37 AM »
Hm... Then it could be the dpi. The dpi is definitely different in the lab and in the office. There is no way around to have the points displayed correctly on different screens?

John Donovan

  • Administrator
  • Emeritus
  • *****
  • Posts: 3275
  • Other duties as assigned...
    • Probe Software
Re: PictureSnap Tips and Tricks
« Reply #14 on: April 19, 2016, 07:48:59 AM »
Hm... Then it could be the dpi. The dpi is definitely different in the lab and in the office. There is no way around to have the points displayed correctly on different screens?

Hi Philipp,
As I said above, I think getting the same size monitor on both computers, might be a "way around". I can't offer a better solution until I understand the problem and for that I need more observations on when it works and when it doesn't and by how much. For example, is it just a difference in monitor size that causes this offset, or is it a difference in monitor DPI?  Or is it caused by a different aspect ratio? I do not know yet...

Let's work together off-line on this and see if we can figure out exactly what what is causing the offset.  Then I can fix it.

Edit by John: It was a DPI difference in the monitors and this issue is now handled automatically in PictureSnap.
« Last Edit: April 25, 2018, 06:44:39 PM by John Donovan »
John J. Donovan, Pres. 
(541) 343-3400

"Not Absolutely Certain, Yet Reliable"