Author Topic: What is your favorite hidden option in PFE?  (Read 10017 times)

ericwgh

  • Post Doc
  • ***
  • Posts: 11
What is your favorite hidden option in PFE?
« on: November 08, 2013, 03:48:11 PM »
Hi all,
this question is triggered by stumbling over some of the hidden options for non-routine analyses revealed by the Ti-in-quartz post. I never tried measuring anything in the sub-10ppm range, but for the 100ppm range analyses, I quickly learned to appreciate 2 great options. "Use Aggregate Intensities", which can combine the count rates from more than one spectrometer, and the "Model Background" function to make a graphical fit through the background in an acquired wavescan, which gives many alternatives to the standard linearly interpolated background intensity.

What are your favorites?

Eric
« Last Edit: April 19, 2016, 11:20:21 AM by John Donovan »

Probeman

  • Emeritus
  • *****
  • Posts: 2836
  • Never sleeps...
    • John Donovan
Re: What is your favorite hidden option in PFE?
« Reply #1 on: November 11, 2013, 04:16:47 PM »
Can I "play too"?    :D

My favorite "hidden option" (probably because of the fact that around 60% of our work is quantitative analysis of 100 to 200 nm films on Si substrates) is the ease with which one can acquire multiple beam energy acquisitions on thin film samples and process them efficiently. But I'll post that to a separate thread because it's more of a method than an option:

http://probesoftware.com/smf/index.php?topic=111.0

As for "hidden" I suspect Eric means "hidden in plain sight", because the unknown count factor with an explanation was right there for trace element analyses, but sometimes it's good to walk through the steps as I did in the Ti in quartz thread here:

http://probesoftware.com/smf/index.php?topic=29.msg387#msg387

So, I'm going to describe the ability to save and recall element setups as a "favorite hidden" option.

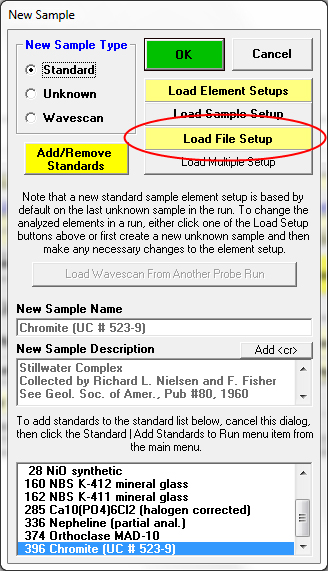
Now most of you already know that once you have a nice sample setup, it's as "easy as pie" to load it from another probe data file along with all the global parameters (and standard intensities if desired) into a new probe data file using the Load File Setup button in the New Sample dialog as seen here:


The Load Sample Setup button (just above that) is of course used for loading a different sample setup from within the currently open run, for example to acquire different sample setups optimized for different minerals all in the same probe run, e.g., feldspar, glass, olivine, etc. Which is nice because you get all the count times, standard/interference  assignments, calculation options, etc., etc., automatically applied to the next acquisition whether it be manual or automated just as you do with the Load File Setup button but without changing the global options. So what's the Load Element Setup button do, as seen here:


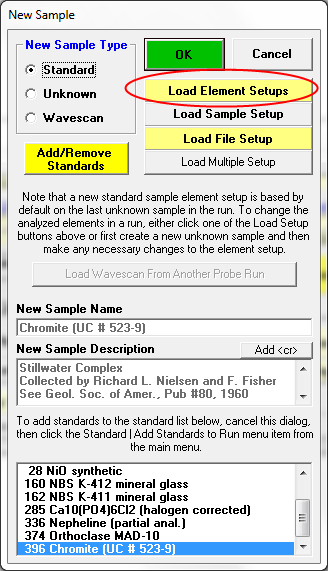
Well, it allows one to easily delete, save and/or load individual setups for new elements, perhaps because you want to add an element, or perhaps you want to find the same element but on a different spectrometer and crystal combination.

In any case, you get to the Element Setup Database dialog as seen here:


which allows one to browse the current sample setup and the element setups within it, and also to search the element setup database for new or replacement element setups. The default is the allow the user to scroll through all the element setups using the Data Cursor, but if you have a specific element in mind, simply type the chemical symbol in the Enter Search Element >> field as seen here and the database will only list element setups for that element:


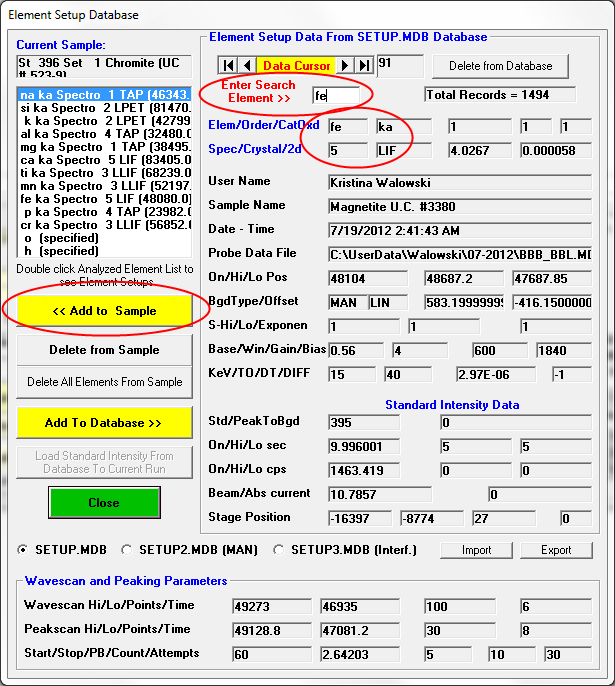
To see the most recent additions to the element setup database, always click the far right Data Cursor scroll button and then scroll back using the next to last scroll button on the right to browse them. Once you have the element setup you want, simply click the << Add To Sample button and it will be added to your sample setup.

To save element setups to the element setup database, one should use the Elements/Cations button from the Analyze! window and click the Save Element Setup button to go into the Element Setup Database dialog again and save their element setups one at a time or (what I do because I'm lazy), is simply select the sample that contains the element setups that I want to save from the Analyze! window sample list and then simply click the Save Setups button seen here:


The cool thing is that when you click this Save Setups button the program will search through your sample setup and find the assigned standard for each element and also save the standard intensity for that element measured on that standard automatically!

Note that because these standard intensities are stored to the element setup database, it is possible (even in off-line mode) to add a standard intensity from the element setup database to your probe run using the Load Standard Intensity From Database To Current Run button in the Element Setup Database dialog- if it is accessed from the Analyze! window Elements/Cations dialog (because if you are off-line, the Acquire! window is not available, right?)


The point being that one can add a standard intensity, say for an interference that they forgot to measure, even if they are no longer running on the instrument. Could be a "game saver"!

So to summarize:

1. From the Analyze! window, one can simply click the Save Setups button to automatically save a bunch of element setups to the Element Setup Database, and if the standards have been acquired, it will also save the standard intensities assigned to that sample.

2. From the Acquire! window (New Sample or Elements/Cations buttons) one can add or remove element setups from one's sample setup quickly and easily to create and/or modify a sample setup.

Please also see this post:

http://probesoftware.com/smf/index.php?topic=5.msg516#msg516

These are my favorite "hidden options", what's your favorite "hidden options"?   :P
« Last Edit: February 09, 2016, 11:51:08 PM by John Donovan »
The only stupid question is the one not asked!

Probeman

  • Emeritus
  • *****
  • Posts: 2836
  • Never sleeps...
    • John Donovan
Re: What is your favorite hidden option in PFE?
« Reply #2 on: January 23, 2014, 03:33:29 PM »
This is a cute feature for changing the count times of your elements by multiple selection. If you have some element count times that you want to change for a group of elements as seen here:


you can simply click and drag the mouse to select multiple rows as seen here:


When you lift up the mouse, the count time dialog will open for those selected elements as seen here:


Now the count time for those four elements was changed from 60 to 70 seconds in one operation as seen here:


The only stupid question is the one not asked!

Probeman

  • Emeritus
  • *****
  • Posts: 2836
  • Never sleeps...
    • John Donovan
Re: What is your favorite hidden option in PFE?
« Reply #3 on: April 07, 2014, 03:15:58 PM »
Another "hidden feature" in PFE is the feature to display images or graphs related to any of the standards in your run as they are clicked on in the Digitize! window (from Automate!).

http://probesoftware.com/smf/index.php?topic=8.msg1107#msg1107

This could be very handy for students or visitors that are not familiar with your standard mounts and could use some additional "cues" for mount navigation or choosing "good" vs. "bad" grains in a mount.
« Last Edit: April 07, 2014, 03:22:22 PM by Probeman »
The only stupid question is the one not asked!

John Donovan

  • Administrator
  • Emeritus
  • *****
  • Posts: 3275
  • Other duties as assigned...
    • Probe Software
Re: What is your favorite hidden option in PFE?
« Reply #4 on: April 13, 2014, 09:25:52 AM »
Here's another useful "hidden" feature in Probe for EPMA...

When you re-calculate a sample composition (analyze), Probe for EPMA automatically outputs the results to the log window and the Analyze! data grids as seen here:


However, sometimes the user would like a more detailed view of each data type for a single analysis point. In this case, simply double click the data point data grid row in question and the software will automatically re-calculate and display all data types specified in Calculation Options for the selected analysis point as seen here:


John J. Donovan, Pres. 
(541) 343-3400

"Not Absolutely Certain, Yet Reliable"

Philipp Poeml

  • Professor
  • ****
  • Posts: 219
Re: What is your favorite hidden option in PFE?
« Reply #5 on: April 20, 2015, 10:05:30 AM »
It's not really a "hidden" feature,

but usually I do setup several sample setups in a file to control operating conditions, analysed files, counting times etc. Now if I make a new (mdb) file, John just pointed out that it is possible to transfer the "saved" sample setups from the old mdb file. To do that, create a new unknown, give it a reasonable name, then choose "load file setup" and choose the unknown setup , i.e. saved sample setup, you would like to transfer. Repeat this for every sample setup you would like to transfer to the new mdb file.

Can be quite handy!

Cheers
Ph

Malcolm Roberts

  • Professor
  • ****
  • Posts: 134
Re: What is your favorite hidden option in PFE?
« Reply #6 on: September 02, 2020, 06:12:08 PM »
This is another of those that is not really hidden but a pretty useful function. Karsten pointed me at it...... Thanks!! I'd been having a bit of trouble getting decent quality images post acquisition. In fact they were pretty much unusable - I am not sure why they didn't work out, but there was a need for these to be re-acquired. Unfortunately, I had deleted the .pos data for these points and had been struggling with getting an ASCII file that Automate! would import using the XYZ coords from the output results. I made use of the "Locate" function under "Acquire!" and created new .pos files, reset the contrast/brightness to the levels they should have been, created a dummy acquisition file (Fe with 3 sec count time MAN) and reran the images automatically. Worked like a charm.
Cheers
Malc
« Last Edit: September 02, 2020, 06:19:02 PM by John Donovan »

John Donovan

  • Administrator
  • Emeritus
  • *****
  • Posts: 3275
  • Other duties as assigned...
    • Probe Software
Re: What is your favorite hidden option in PFE?
« Reply #7 on: September 02, 2020, 09:49:44 PM »
Yeah, when acquiring images automatically during the automated point acquisitions, it is really important to be sure that all the imaging detector parameters (brightness/contrast/bias) are properly set for the specified beam conditions prior to the automation.

Neat that you figured out how to re-acquire the images on the automated points using the Locate dialog. It can be useful for returning to your previously acquired positions for various purposes.
John J. Donovan, Pres. 
(541) 343-3400

"Not Absolutely Certain, Yet Reliable"

Ben Buse

  • Professor
  • ****
  • Posts: 488
Re: What is your favorite hidden option in PFE?
« Reply #8 on: January 24, 2023, 03:03:05 AM »
Only just discovered the 'locate' button referred to above (thank you John for pointing it out)

Hidden in plain site within a acquire window,

Stores the location of all points acquired and allows you to return to points (including those not listed in automate window)

Loving it.

Ben